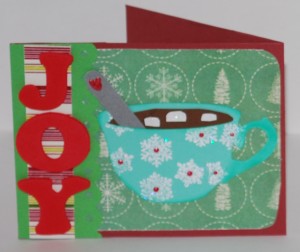
The Joy of Hot Chocolate Gift Card
Hello All,
Sometimes in life you just don’t want a fancy coffee drink. But some good old hot chocolate made at your fancy coffee place. So make your love one’s this easy to make gift card holder.
***If you do not have a die cutting machine or cartridges check out below for fussing cutting patterns offered free everyday by the good people at Scrapbooks ETC.***
Materials:
- Red Cardstock
- Blue Cardstock
- Green Cardstock
- White Cardstock
- Gray Cardstock
- Red Foam letters
- 2 coordinating Pattern Paper
- Red Glitter Glue
- Stamp w/ Embossing Ink or Cuttlebug Folder
- Cricut Machine and a Child’s Year Cartridge
Step 1 – Card Base
Cut your red card stock at 3 7/16 x8 ½, score your card 3 ½ then form your score line score at 4 ½. Fold your card stock by doing so will give you a tri fold card with a little lip. Take your gift card and slip it between the small fold. Take your pencil and make a small mark on the edge of your gift card. Remove your gift card, take your stapler and staple about one centimeter away from your pencil mark.
Step 2 – Decorating your front
Turn your gift card holder over so the back is facing you. You should have a rectangle shape that measures 3 7/16 x 4 ½
Take your pattern paper and cut out a rectangle at 4 ¼; by 3 ¼ make sure that your staples are covered with the pattern paper. If you find that your pattern paper doesn’t cover your staples not to worry cut out a 1 ½ x 3 7/16 strip of green card stock. Use your scallop boarder punch or any other boarder punch that you desire, if you do not have a boarder punch you could use decorative scissors. Cut a coordinating paper pattern about ½ inches and lay it over your green boarder.
Using a Child’s Year on page 67 under the “Icon” section you will find a tea cup and saucer. Cut this image at 3 inches. Using your scissors cut out the saucer portion of the die cut. Using some ink and sponge shade the outer rim of your tea cut. After shading you can emboss it with your favorite stamps or CuttleBug to give it texture.
To give your tea cut more depth you can cut a bit of brown cardstock measuring the width of the inner most part of the tea cup. I found making an oval works best when I glue it. To make the marshmallow I just cut different small size rectangles and then nip the edges on one side.
The spoon is rectangle that has been rounded on one end and wedge between the brown cardstock and tea cup. I then used a bit of red glitter glue and free hand a heart at the end of the spoon. Then used that same glitter glue to add red dots to each snow flake.
I grab some red foam letters spelling out JOY and position them over the board and center my now hot chocolate cup onto the gift card.
Step 3 – Decorating you one 1 ½ inch Flap
Take some coordinating pattern paper and cover your flap leaving a ¼ boarder or enough to cover your staples.
Hot Chocolate SBE <—– Click here!!
